Nice!
Did you do some sort of pinning to the trees or just glue?
Have you considered having the trees in slight more dense scenario 'tree groups' (kinda like the photo you have), but easy to remove if you wish to store, or else?
Also if they are not attached to the pitch, if they get hit by accident, they might just 'move aside' instead of breaking.
Classic Dungeonbowl pitch. Moor pitch Feb 18th 2013
Moderator: TFF Mods
-
Axtklinge

- Legend

- Posts: 1948
- Joined: Fri Apr 16, 2004 2:08 am
- Location: Porto, Portugal
- Contact:
-
the solitaire

- Star Player

- Posts: 530
- Joined: Sun Mar 21, 2010 8:59 am
- Location: germany
Re: Classic Dungeonbowl pitch. Moor pitch progress Jan 26th
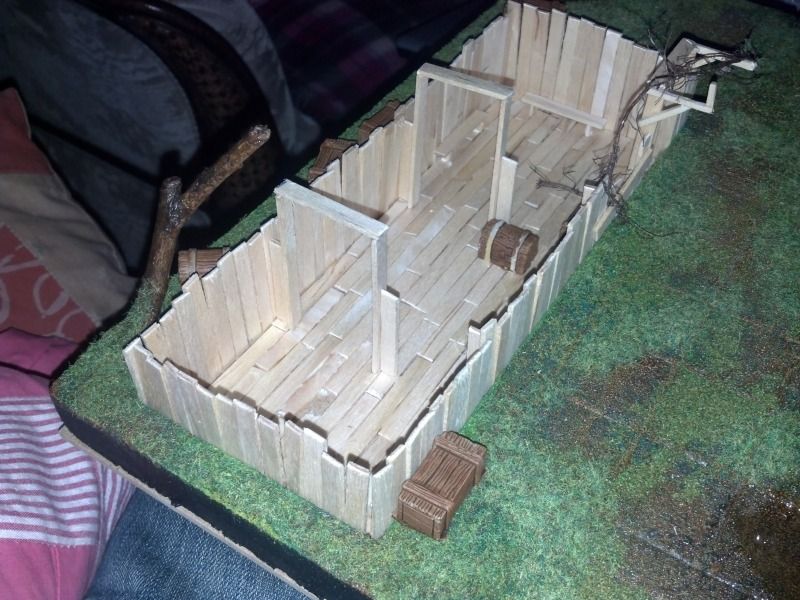
I´m not sure if it counts as pinning but I stuck the wood about 10mm deep into the styrofoam and then glued them in place. 
I really appreciate your feedback. Your approach to terrain appears to be not that different from mine, but different enough to transfer ideas straight over to my projects.
I kept the bits of wood low enough so everything will still fit in the case I intend to build to store the pitch.
I thought about planting the trees a lot more dense, but decided against it because I wish to have good access to the pitch and because the turn, reroll and score fields are positioned on the sidelines. Did not wantto clutter them.
The bog/moor I wish to recreate is a type found in the Ruhr area in Germany (that´s the area I live in). It doesn´t feature the dense tree growth like shown in the picture I posted before. I will see if I can find a better picture somewhere.
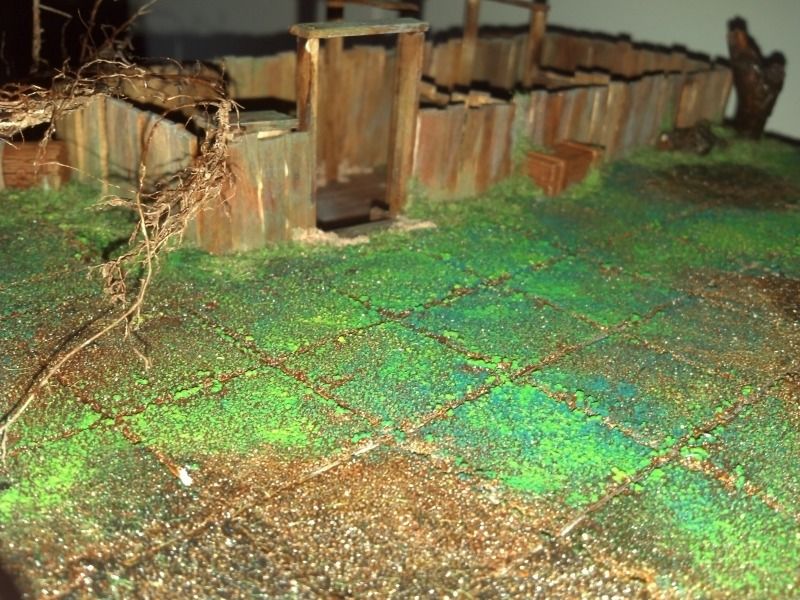
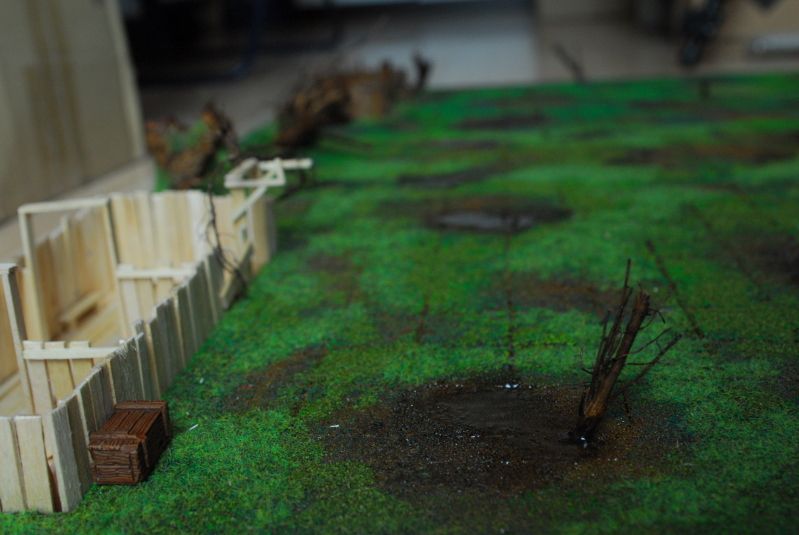
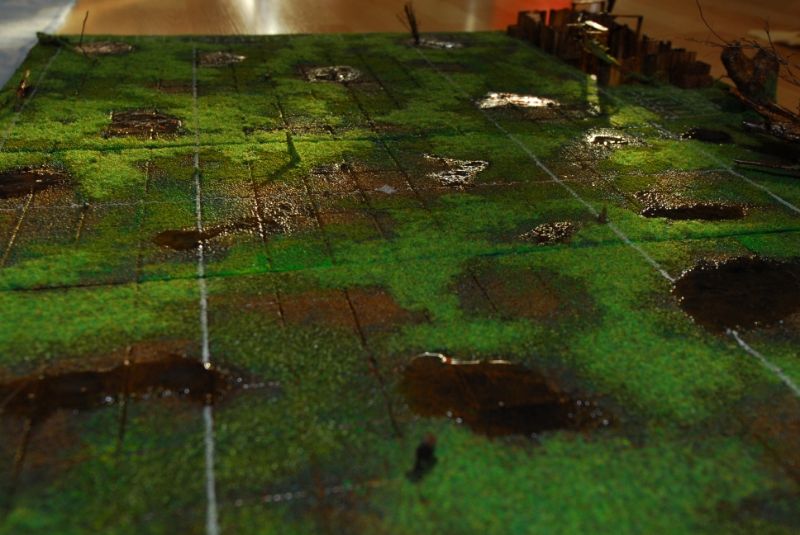
I made some progress on the middle part of the pitch. Added static grass and acrylic water. Now I need to wait for at least 8 hours before I can start adding clump foilage to the board.
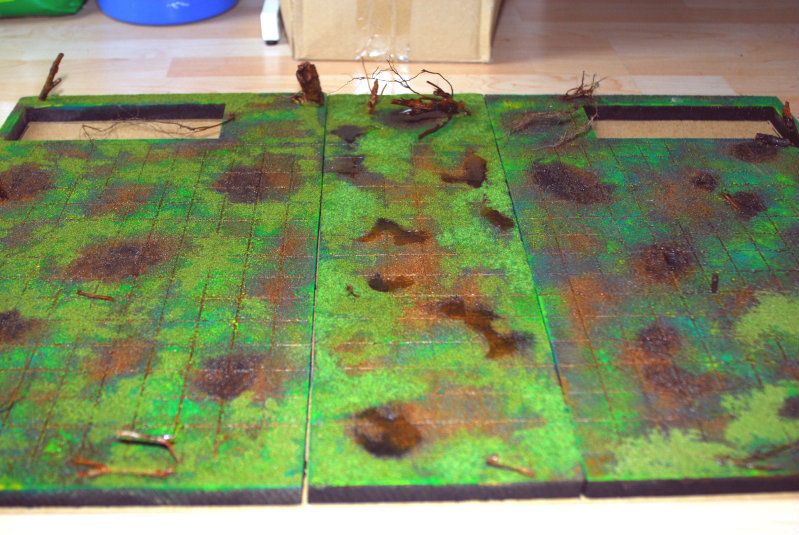
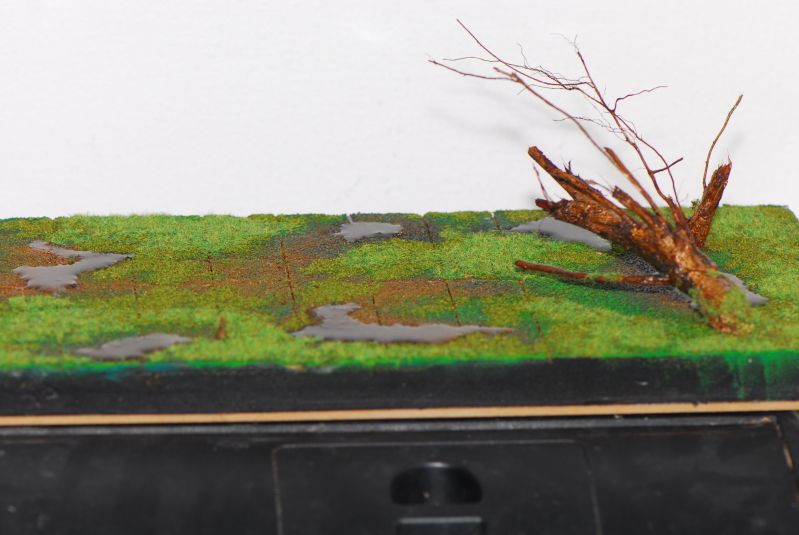
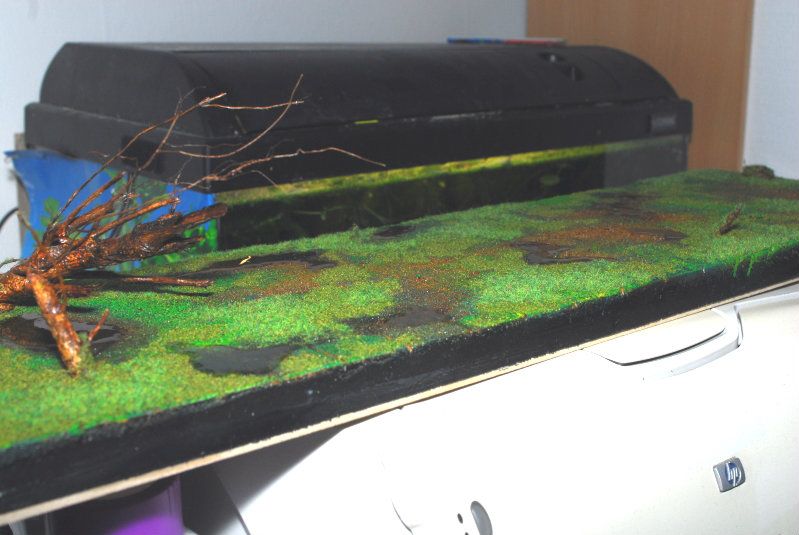
Tomorrow I´ll need to get some stir sticks to make dugouts with, and more flock because mine went out before I could finish the last piece of the pitch.
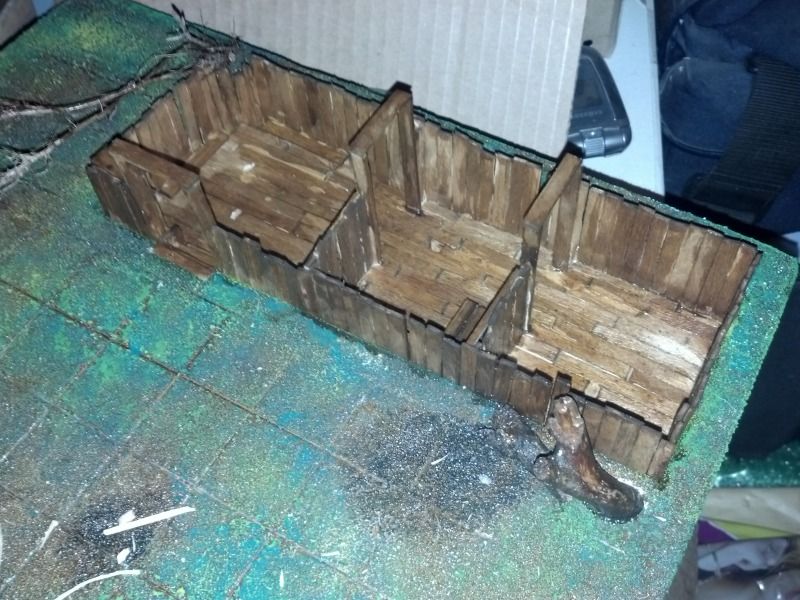
Made some progress on the dugouts today, or at least one dugout.
Some aging of the wood. More to follow (greytones and greens)
I really appreciate your feedback. Your approach to terrain appears to be not that different from mine, but different enough to transfer ideas straight over to my projects.
I kept the bits of wood low enough so everything will still fit in the case I intend to build to store the pitch.
I thought about planting the trees a lot more dense, but decided against it because I wish to have good access to the pitch and because the turn, reroll and score fields are positioned on the sidelines. Did not wantto clutter them.
The bog/moor I wish to recreate is a type found in the Ruhr area in Germany (that´s the area I live in). It doesn´t feature the dense tree growth like shown in the picture I posted before. I will see if I can find a better picture somewhere.
I made some progress on the middle part of the pitch. Added static grass and acrylic water. Now I need to wait for at least 8 hours before I can start adding clump foilage to the board.
Tomorrow I´ll need to get some stir sticks to make dugouts with, and more flock because mine went out before I could finish the last piece of the pitch.
Made some progress on the dugouts today, or at least one dugout.
Some aging of the wood. More to follow (greytones and greens)
Reason: ''
If you can´t fix it with a hammer, you have an electric problem
-
Axtklinge
- Legend
- Posts: 1948
- Joined: Fri Apr 16, 2004 2:08 am
- Location: Porto, Portugal
- Contact:
Re: Classic Dungeonbowl pitch. Moor pitch dugouts 28th 2013
Those patches of water look great.
I have a league mate starting to build a pitch that intends to use a LOT of water, so if you can spare a few lines reviewing the 'water' experience it might be interesting.
Oh, and love the way you've placed the dugouts at a lower level.
Very nice detail!
Ps: By the way, I've done some updates on my DB project:
http://bloodbowlmayhem.blogspot.pt/2013 ... s-pt2.html
Reason: ''
-
the solitaire
- Star Player
- Posts: 530
- Joined: Sun Mar 21, 2010 8:59 am
- Location: germany
Re: Classic Dungeonbowl pitch. Moor pitch dugouts 28th 2013
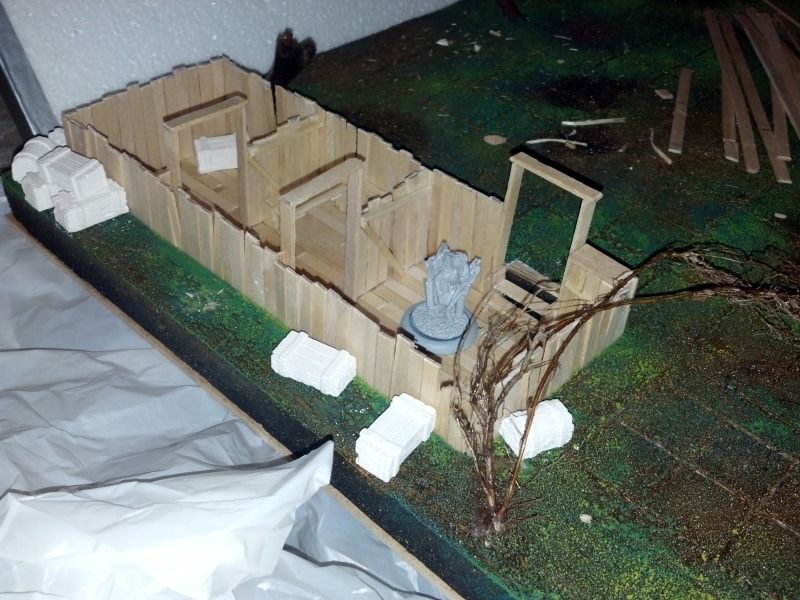
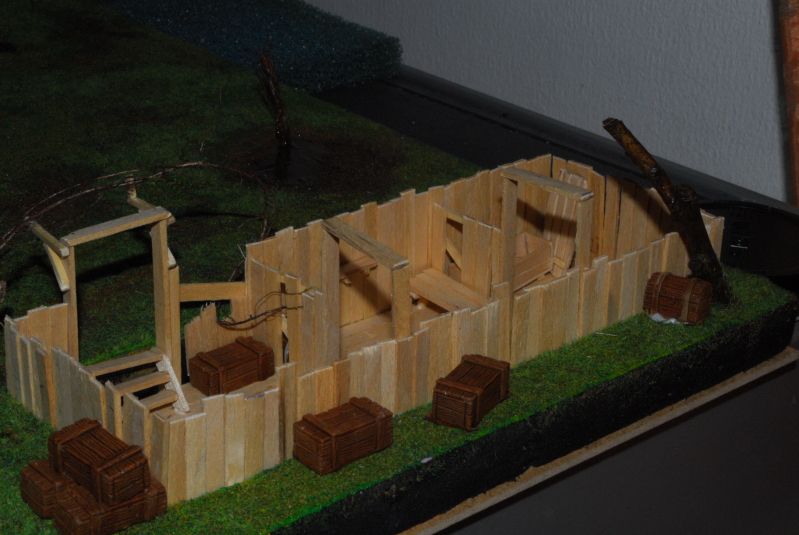
I added some detail to the dugout that I made yesterday.
Added static grass, some crates and sand.
The layout shows that I made the reserves part a bit bigger then the KO´d and Injured and dead sections.
The reserves section holds up to 5 30mm bases. The other two sections 3 each after all the detail is added.
Still need to add some surgical gear, bottles and of course coffins.
As to the puddles, I use a German product made by a company called Creartec. The product is called fluid water.
I bought a 250 ml container. What I like is that the product flows well. I used Vallejo water effects and never got a smooth surface. This stuff automatically gives you a smooth surface.
The 250 ml container has a nice nozzle that provides excellent control on how much of the product you apply.
The usage instructions states the maximum thickness for a single application at 2-3mm. It needs to dry for 48 hours after that.
During the curing process you need to keep your product absolutely level. Otherwise the product runs or your water isn´t level after it dried.
I applied 2mm layers twice now. They shrink to about half their depth during the curing process. It´s no problem to add another layer and the final result is still perfectly clear. You don´t see that you applied more layers as long as you make sure to keep the surface sterile before applying another layer.
I would use this for shallow water applications. For deep water, better use Woodland Scenics realistic water.
I will have to make some new pictures after 96 hours of curing and 2 applications on the board I made. I am now at about 80 hours curing time, so I know the water surfaces will shrink a little still in the next few hours
Reason: ''
If you can´t fix it with a hammer, you have an electric problem
-
the solitaire
- Star Player
- Posts: 530
- Joined: Sun Mar 21, 2010 8:59 am
- Location: germany
Re: Classic Dungeonbowl pitch. Moor pitch dugouts 28th 2013
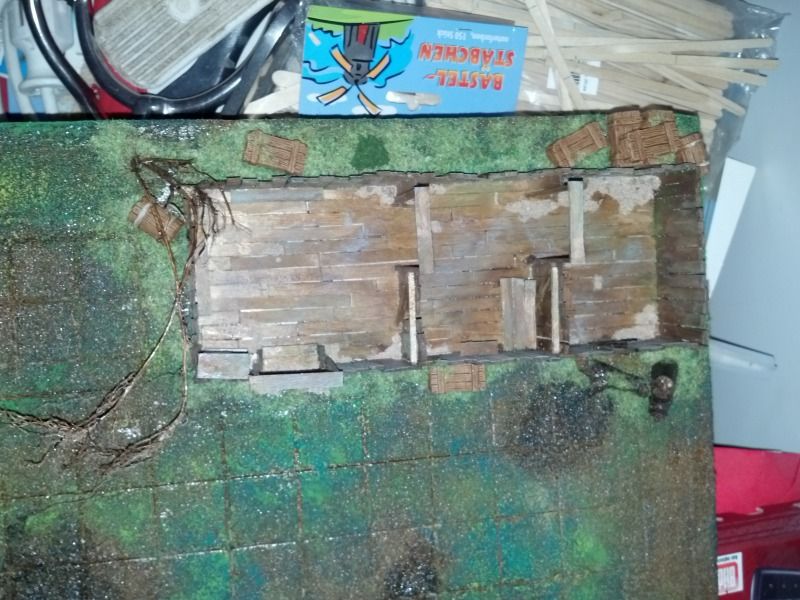
I started work on the second dugout.
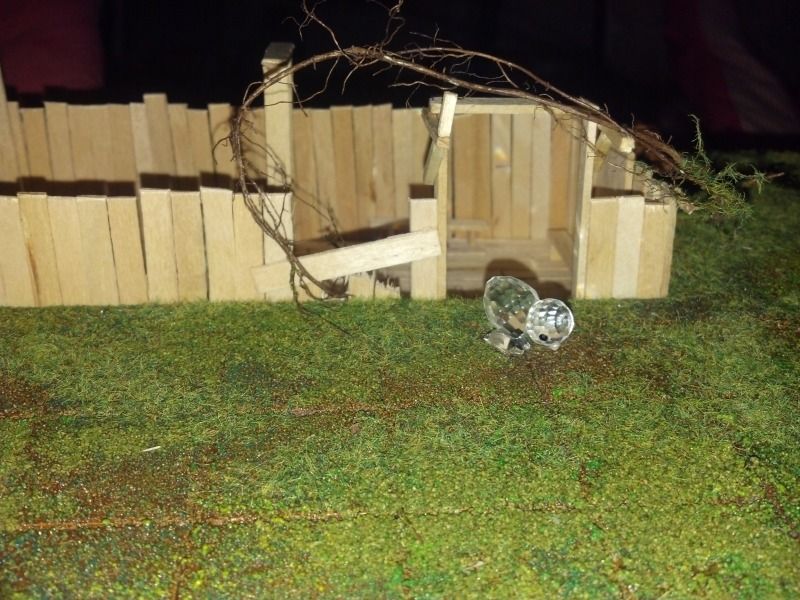

Don´t mind the crystal duck. My girlfriend placed it there while I wasn´t paying attention.
I also applied a 3rd layer of acrylic water on this half of the pitch. That should be the last layer needed on that part of the pitch.
Now I have to wait for the basing flock to show up before I can continue with the last part of the actual pitch. After that I need to build some kind of transport for the pitch.
Reason: ''
If you can´t fix it with a hammer, you have an electric problem
-
Steam Ball
- Super Star

- Posts: 977
- Joined: Mon Nov 01, 2010 6:21 pm
Re: Classic Dungeonbowl pitch. Moor pitch dugouts 30th 2013
Non flat water with Vallejo? Was it the "Still Water" one? Because the instructions and problems sound pretty much like the one you used, including the shrinking issue. The other water effects are acrylic pastes, thick, some with tints, and will never auto-flatten.
Reason: ''
-
the solitaire
- Star Player
- Posts: 530
- Joined: Sun Mar 21, 2010 8:59 am
- Location: germany
Re: Classic Dungeonbowl pitch. Moor pitch dugouts 30th 2013
Never tried Vallejo Still Water. If it works like the stuff I used now I´d be happy using it.
I do not really consider the shrinking to be a big drawback. It just requires additional applications with curing time.
I did try Water Effects in the past and even though its great for waterfalls etc. I´d never use it for flat water surfaces again
I do not really consider the shrinking to be a big drawback. It just requires additional applications with curing time.
I did try Water Effects in the past and even though its great for waterfalls etc. I´d never use it for flat water surfaces again
Reason: ''
If you can´t fix it with a hammer, you have an electric problem
-
Steam Ball
- Super Star
- Posts: 977
- Joined: Mon Nov 01, 2010 6:21 pm
Re: Classic Dungeonbowl pitch. Moor pitch dugouts 30th 2013
Yes, the other products are for waterfalls, fountains, waves and anything that has to keep the form you give it. It's transparent modelling paste, sometimes with blue tints.
The shrinking is a surprise the first time you use it, specially for mud puddles, as it shrinks more where it's thicker. Even if you spread and try to go for 2mm thick, it flows to the center making a >2mm zone... that then "deflates" once dry. Or so it did when I started, it gave the puddle a "someone remove the plug" look. Anyway, applying again over the problem, and in thinner coats just covering where it wants to flow freely (start at the bottom points and add 2mm, no more), solves it.
The shrinking is a surprise the first time you use it, specially for mud puddles, as it shrinks more where it's thicker. Even if you spread and try to go for 2mm thick, it flows to the center making a >2mm zone... that then "deflates" once dry. Or so it did when I started, it gave the puddle a "someone remove the plug" look. Anyway, applying again over the problem, and in thinner coats just covering where it wants to flow freely (start at the bottom points and add 2mm, no more), solves it.
Reason: ''
-
the solitaire
- Star Player
- Posts: 530
- Joined: Sun Mar 21, 2010 8:59 am
- Location: germany
Re: Classic Dungeonbowl pitch. Moor pitch dugouts 30th 2013
The puddles are working out just fine. Decided to add a 4th layer and blend it into the terrain a bit more using a brush to move the acrylic mass to where I want it.
I made some more pictures to show the progress:
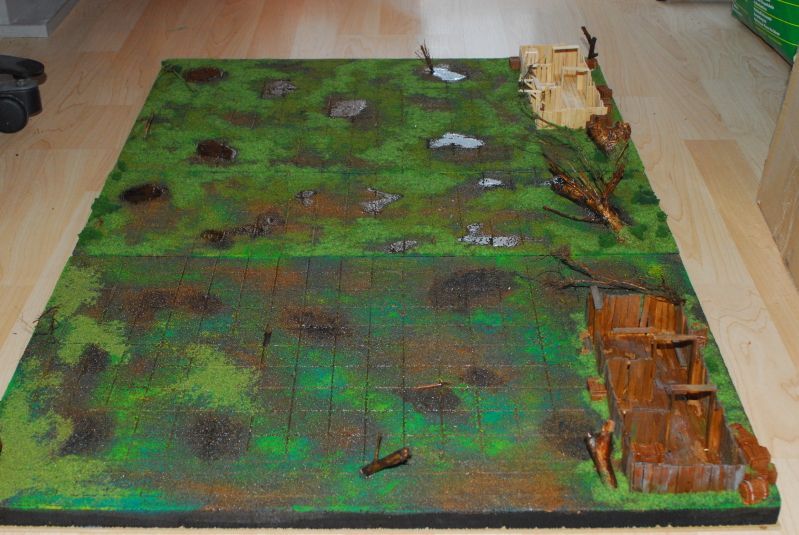

I made some more pictures to show the progress:
Reason: ''
If you can´t fix it with a hammer, you have an electric problem
-
velvet mark

- Veteran

- Posts: 245
- Joined: Mon Jul 30, 2012 5:27 pm
- Location: Manchester, UK
- Contact:
Re: Classic Dungeonbowl pitch. Moor pitch dugouts Feb 1st 20
The dungeon looks fantastic solitaire, it's come out great!
The pitch is great too. How will you mark out the sidelines and end zones? Usual white lines or maybe some skulls and bones arranged neatly, as if the players have marked it themselves with anything available, 'jumpers for goal posts' style?
The pitch is great too. How will you mark out the sidelines and end zones? Usual white lines or maybe some skulls and bones arranged neatly, as if the players have marked it themselves with anything available, 'jumpers for goal posts' style?
Reason: ''
-
the solitaire
- Star Player
- Posts: 530
- Joined: Sun Mar 21, 2010 8:59 am
- Location: germany
Re: Classic Dungeonbowl pitch. Moor pitch dugouts Feb 1st 20
My apologies for the lack of progress on these two projects.
For the Dungeonbowl pitch I need to purchase materials to make a case. I am strongly considering covering the exterior of the case in leather.
The moor pitch also needs a case, which is a concern for later though.
I ordered flock to continue my work. When the mailman delivered my order I found out that I had ordered the wrong stuff. Flock is not necessarily flock as it appears. This stuff is like green dust.
I ordered more flock. It was delivered. The color didn´t match. Ordered more flock, which was delivered last Saturday. This finally is roughly the right stuff, so I finished flocking and applying grass. Right after I clearcoated the grass to make sure it stays on there I applied acrylic water. The acrylic water is drying as we speak. More pictures soon!
I´m going to paint white lines on the board to mark the field as well as the turn, re-roll and score areas.
Reason: ''
If you can´t fix it with a hammer, you have an electric problem
-
the solitaire
- Star Player
- Posts: 530
- Joined: Sun Mar 21, 2010 8:59 am
- Location: germany
Re: Classic Dungeonbowl pitch. Moor pitch dugouts Feb 1st 20
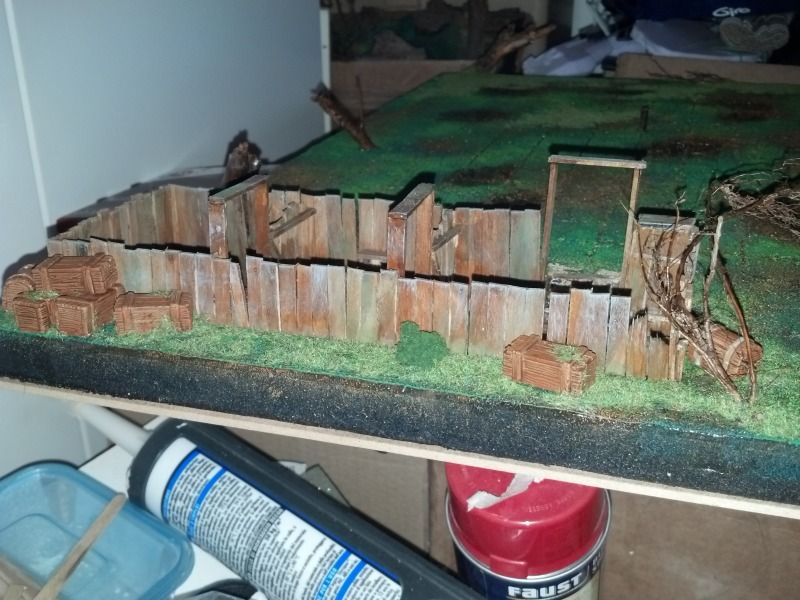
Time for updates
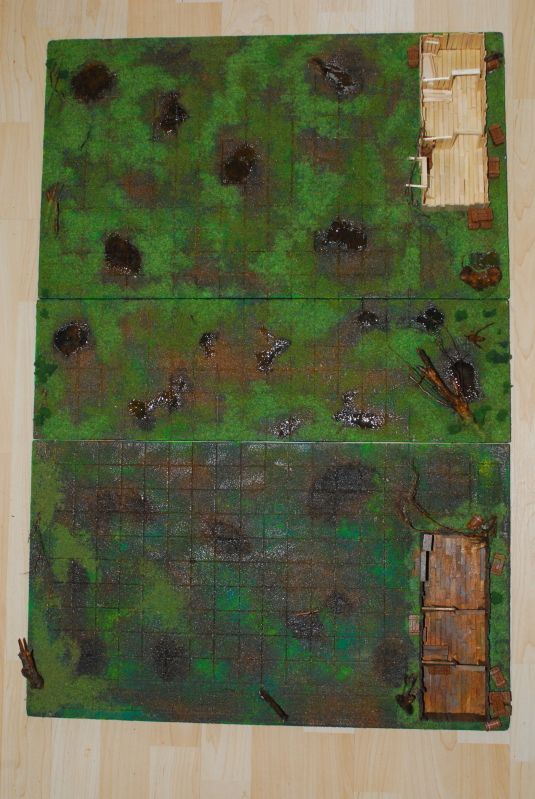
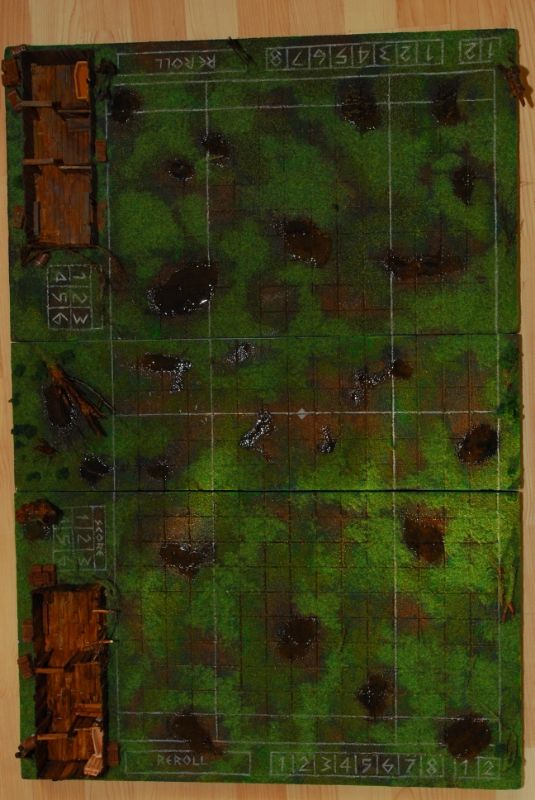
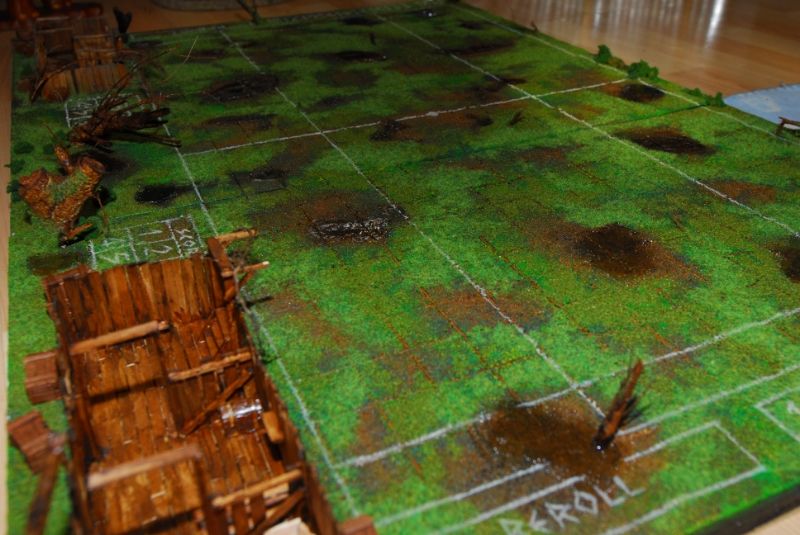
I finished painting the lines, applying static grass and flock and most of the major building and painting.
I wanted this field to be as compact as possible while still featuring some stylish dugouts.
To achieve that, while still adding some tree stumps and bits to get that moor like look I had to be creative with where my turn, score and re roll counters would go.
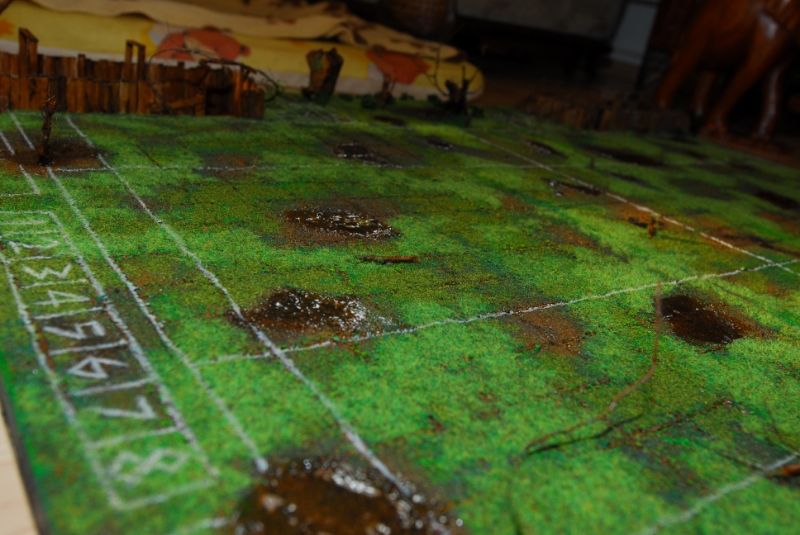
I decided to make 8 1"x1" fields to use as turn counter, and added 2 more fields marked 1 and 2 to indicate 1st and 2nd half.
Due to a lack of space I decided that 6 field score counters would do. I never scored more then 6 touchdowns in a game of bloodbowl so for a field for personal use this decision is ok.
I made a 6"x1" sized area in which reroll counters can be placed.
And of course the dugouts with all the required bits and pieces.
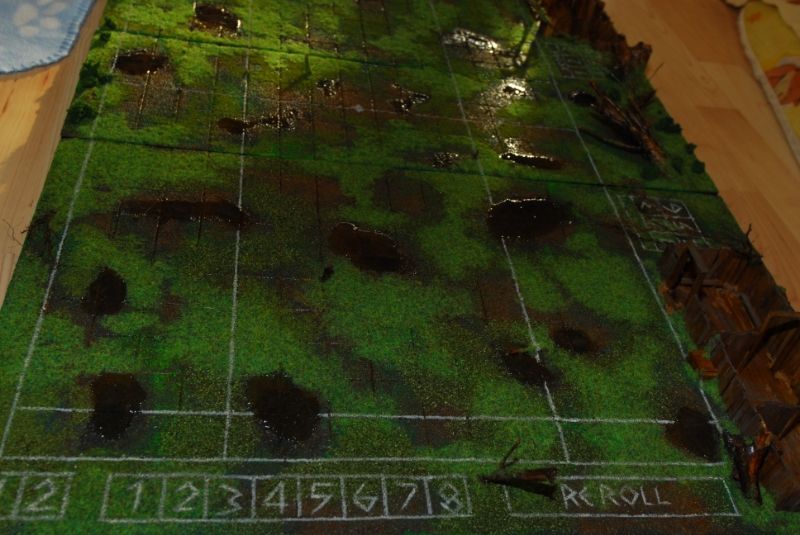
I am quite happy with results of the acrylic water. It´s not entirely flat but good enough for me.
One thing I still need to decide on is what sort of logo should go in the center of the field. The regular skulls or something more moor´ish?
Next up for this field is making a case to transport and store it in
Apologies for posting the links to the ictures only. The forum doesn´t let me post the pictures even though I resized them
I finished painting the lines, applying static grass and flock and most of the major building and painting.
I wanted this field to be as compact as possible while still featuring some stylish dugouts.
To achieve that, while still adding some tree stumps and bits to get that moor like look I had to be creative with where my turn, score and re roll counters would go.
I decided to make 8 1"x1" fields to use as turn counter, and added 2 more fields marked 1 and 2 to indicate 1st and 2nd half.
Due to a lack of space I decided that 6 field score counters would do. I never scored more then 6 touchdowns in a game of bloodbowl so for a field for personal use this decision is ok.
I made a 6"x1" sized area in which reroll counters can be placed.
And of course the dugouts with all the required bits and pieces.
I am quite happy with results of the acrylic water. It´s not entirely flat but good enough for me.
One thing I still need to decide on is what sort of logo should go in the center of the field. The regular skulls or something more moor´ish?
Next up for this field is making a case to transport and store it in
Apologies for posting the links to the ictures only. The forum doesn´t let me post the pictures even though I resized them
Reason: ''
If you can´t fix it with a hammer, you have an electric problem
-
velvet mark
- Veteran
- Posts: 245
- Joined: Mon Jul 30, 2012 5:27 pm
- Location: Manchester, UK
- Contact:
Re: Classic Dungeonbowl pitch. Moor pitch Feb 18th 2013
Great job. the water looks the part. I think you will be okay with the score only going to six.
For the logo I would do something Will-o'-the-wisp style, eerie OSL like the rune writing on this drop pod. http://fantasygames.com.pl/wp-content/u ... od-big.jpg Maybe some evil eyes or carved pumpkin face?
For the logo I would do something Will-o'-the-wisp style, eerie OSL like the rune writing on this drop pod. http://fantasygames.com.pl/wp-content/u ... od-big.jpg Maybe some evil eyes or carved pumpkin face?
Reason: ''
-
the solitaire
- Star Player
- Posts: 530
- Joined: Sun Mar 21, 2010 8:59 am
- Location: germany
Re: Classic Dungeonbowl pitch. Moor pitch Feb 18th 2013
The idea with the pumpkin is a good one.
I gave it a try, including some OSL.
First I have to say, it´s pretty difficult to paint straight lines and nice gradients on a surface covered with sand, flock and static grass.
I gave it a try and I think this is as good as it will get.


Since this is the line of scrimmage I figured that just a layer of clearcoat won´t protect the pumkin for long so I applied a thin layer of acrylic water and will apply matt varnish to take away the shine
I gave it a try, including some OSL.
First I have to say, it´s pretty difficult to paint straight lines and nice gradients on a surface covered with sand, flock and static grass.
I gave it a try and I think this is as good as it will get.
Since this is the line of scrimmage I figured that just a layer of clearcoat won´t protect the pumkin for long so I applied a thin layer of acrylic water and will apply matt varnish to take away the shine
Reason: ''
If you can´t fix it with a hammer, you have an electric problem
-
velvet mark
- Veteran
- Posts: 245
- Joined: Mon Jul 30, 2012 5:27 pm
- Location: Manchester, UK
- Contact:
Re: Classic Dungeonbowl pitch. Moor pitch Feb 18th 2013
Wow solitarie, that looks lovely! Great job the eyes look cool:D
Reason: ''