

------------
In this Step By Step Tutorial I try to explain how to use Green Stuff (GS from now on) to do conversions of around 28mm miniatures, to do that I use the example of a Warhammer Fantasy Lizarmen Skin that I convert into a Blood Bowl Skin player.
Introduction
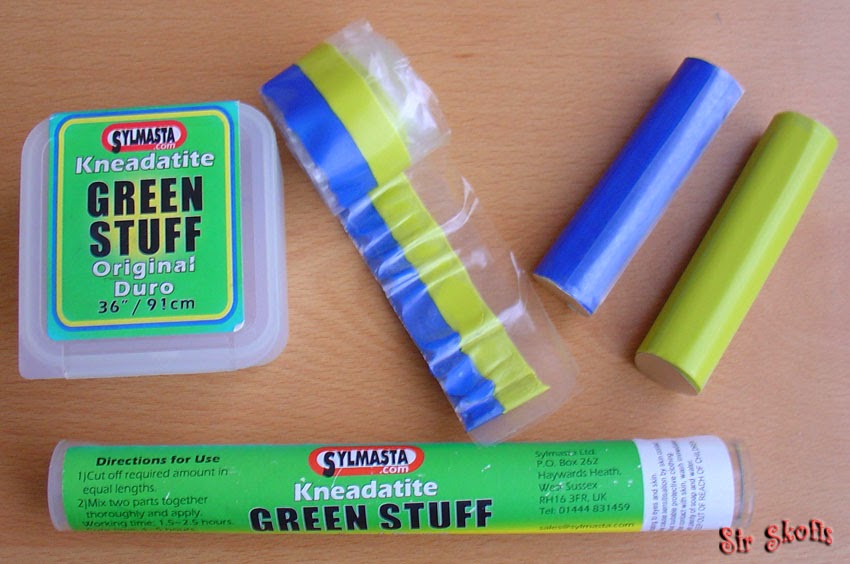
I'm going to work with GS that probably is the most known modelling putty, maybe because Games Workshop sells it. In my case I use Sylmasta's GS DURO, this putty has two components a blue one and a yellow one. The GS is sold in different formats, I normally use the reel version but is also available in stick format as it can be seen in the picture below.
For painting you need paints and brushes, to do conversions or sculpting works you need putty and a tools to shape it. The most basic tool is a sculpting tool with a flat sharp side and a small curve and round side, there are also other sculpting tools with other shapes that can be useful as well as "shapers" that are similar to a plastic brush with different shapes. I know some people that is able to make really impressive works with only putty and a toothpick what that requires a lot of experience and is easier to use a sculpting tool.
I have 13 different sculpting tools but the sculpting tool that I used the most is the basic one that I have described in the paragraph above. This kind of sculpting tool is sold by Games Workshop and also by other manufacturers, I bought 12 sculpting tools for a little more than the price of the sculpting tool sold by GW so I recommend that if you don't have a sculpting tool yet look around EBay before deciding to buy any.
Besides the sculpting tool I also use other tools:
- X-Acto knife
- Strong Hobby-knife
- Sandpaper
- Some files
- A container to hold some water
- A pin (to make small holes for example to help place some ribets latter on)
- A pointy object (like a toothpick but I use a bretonnian lance, I used it to make chainmail and holes bigger than the ones from the pin)
- A "rolling pin"/something to use to flat putty (I use a dried marker)
- Shapers (I only have one but there are quite useful I'm trying to get some more, you can use them to smooth surfaces, and to make wrinkles in sculpted pieces of cloth)
- Hand fingers (each one their own, there are moments that you will have to use your fingers, if you are allergic to the GS you can use some latex gloves, providing you are not allergic to those too)

Aside from the GS/modelling putty I use:
- Water (it is essential when you work with GS)
- Wire (to make armatures if you are thinking on adding and arm of you want to make a miniature from scratch)
- Sprues (to make armatures too, but also for a lot of different uses)
- Talc/Talcum Powder (if you mix it with water you can make flat things that doesn't stick to the surface where you are working as explained here)
- Glue (I use cyanoacrylate)

Before making any conversion or miniature is useful to have a clear idea of what you want to obtain, you maybe have come up with a theme for your army or you want to make a new miniature or maybe you have found and image that you want to reproduce, etc. In this tutorial I wanted to make a blood bowl skin player, I get ideas from different place but is going to be pretty similar to the skin player from the Cyanide Blood Bowl PC game.

In the picture below you can see the miniature that I'm going to convert deburred and ready. Depending on what you want to do it could be useful to not glue all the pieces so you have more space to move your tools.

Kneading GS
We will have to make this step a few times. I found that is better work with small quantities of putty and knead more times if you want to use the putty more efficiently, avoiding that some part of the putty gets too cured and impossible to use.
We start by cutting some GS. In general you should try to have the same quantity of blue and yellow components.

Then we knead the two components together until we have an homogeneous ball of a green color. The GS tends to stick a lot to our fingers and every tool unless we wet them first. So make sure you always have some water around when working with GS, you will have to wet your tools from time to time or the putty will stick to them and probably ruin you work or a part of it.

Careful! GS is and irritant product that may cause sensitisation by skin contact.
When working with the GS Reel format you will find that the part in contact between the blue and yellow component is cured and if you don't take it out you could find yourself unable to smooth a surface because that cured part is right there.

Making the armour for the skin tail (about 45 minutes)
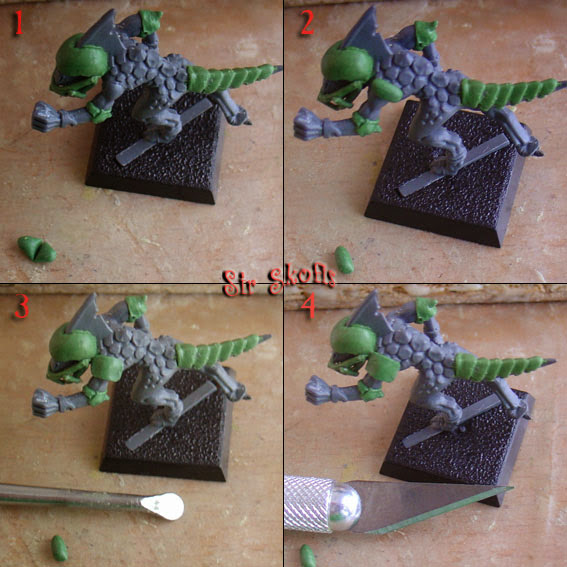
I have the putty kneaded and ready. I'm going to start working in the tail armour. I take some GS and make a sausage with it, I compare it with the size of the tail to make sure I will have enough GS (1). With my fingers wet I push the putty against the skin tail (2). I push the GS a little more using the curved side of the sculpting tool (3). As I already said it is important that the tools that we use are wet, in 4 can be seen a zone that is tear up because the GS stuck to the sculpting tool, in this step of the process is not really important as we haven't make any detail work yet and wetting the sculpting tool and pressing the GS again we can solve it quickly (5).

When the GS is placed in the tail I start shaping it. It is an armour made by some small protections join together. I make this protections by pressing the flat part of the sculpting tool against the GS (1), remembering to wet it from time to time. Then I cut the extra GS at the tip of the tail with X-Acto knife (2). I also cut some putty to give a better shape to the individual protections (3). Obtaining the result shown in 4.

Looking at the model from the other side I found that there wasn't enough GS at the base of the tail (1). If something similar happen to you, don't panic it has a quite an easy solution, you don't have to start the work from the beginning, simply take a small ball of GS and press it to the place where it is needed with your fingers if it is possible of with a tool if you cannot reach with your fingers (2). Make sure that the place where you put the GS is dry or you will have problems joining it to the rest of the GS. Continue pressing the GS in place with the curved part of the sculpting tool (3) trying to merge it with the rest of the GS, paying attention to the edges (4). When you are done give the area the right shape and cut all the excess.

To give a more realistic aspect to the armour I decided to "hold" it in place with some straps. To make the straps make a really thin GS sausage (1). Cut pieces of the GS sausage (2) and carefully place them underneath the tail (3). This may seem quite easy but it isn't as the putty pieces are quite small and is really difficult to made them stick to the model instead of the tool. With the X-Acto knife cut the excess of GS of the ends of the straps (4). Finish by making the straps flat with the curved part of the sculpting tool (5).

Making the Helmet (around 20 minutes)
To make the helmet knead more GS and make a thick GS sausage (1). Place the sausage with the fingers in the forehead of the skin (2) and push it to the head giving to it a rough shape (3). With the curved part of the sculpting tool continue shaping the helmet until the helmet looks like a helmet (4). In 5 can be seen that the left side of the helmet is a little too tick so be cut of some of the GS with the X-Acto knife (5) and reshape a little with the helmet with the curved part of the sculpting tool (6).

I decided to add some facial protection to the face, to make it some really thin GS sausage are needed. The Protection will have two horizontal pieces and three vertical tubes between them. Make two long thin GS sausages and a short one. With your fingers give a curved shape to the two long ones and place them in the helmet. The two GS sausages where a little too long so I didn't joined the ends to the helmet, when the GS is cured we'll cut them. The short sausage is left to cure as straight as possible, when it is cured we will cut three pieces and glue them to the two horizontal parts of the facial protection.

Adding some details to the arms and shoulders (around 35 minutes)
Once the putty from the helmet and the tail armour is cured we glue the arms to the model. I previously have cut off the arms that the hands were holding.

I'm going to add an elbow guard with a spike. Take a little bit of GS (1) and place it in the elbow with your fingers (2). With the curved part of the sculpting tool push the putty until a closed ring is made (3). With the flat part of the sculpting tool improve the shape of the elbow guard and its strap, making sure that there is a clear limit between the guard and the strap (4). Then, poke a hole with a pointy object in the center of the guard (5), this hole will help us place the spike and hold it to the rest of the putty. Make a small putty sausage with pointy ends and cut it in half, each half is going to be a spike. Place the spike in the hole and try to join it to the rest of the putty without deform it a lot (6). Repeat the process in the other arm.

I also decided to make the skin a shoulder pads in each shoulder. If you want to make something that has roughly the same size I recommend that you make a sausage with putty and half it, then try to do what ever you are doing with the first half, if you need more add the same quantity to the other half, if you need less cut out the same quantity from the other half. So to do the shoulder make a putty sausage and cut it in two halves (1). Take one of the halves and place it on the shoulder (2). Smooth and shape the putty with the curved part of the sculpting tool (3) and then straight the edges with a X-Acto knife or the flat part of the sculpting tool (4). Repeat the process in the other shoulder.
The skin now looks like you can see in the picture below.

If you focus your attention in the right shoulder pad you will see a little yellow line with a blue contour, that's one of the cured pieces that you can find in the GS Reel format. When I knead that GS I forgot to take it out. Normally I will have take it out but I was out of GS and I was able to push it until the surface was smooth.
Helmet finishing touches (around 10 minutes)
To finish up with the conversion we need to add some putty where the facial protection join the helmet. Made two small putty balls (1), one for each side. Place each ball in one side (2) and flat it and shape it with the curved part of the sculpting tool (3).
As I had some putty left I decided to add a stripe at the center of the helmet by placing a putty sausage in the center of the helmet (4), flattening it with the curved part of the sculpting tool (5) and cutting it to the right size with an X-Acto knife (6).

Result

My objective when I make this tutorial was to show how to work with green stuff in the hopes of encouraging more people to do it. I hope I have succeed, it isn't difficult and you can obtain really unique miniatures.
Cheers!


