Hi Painted Goblin,
I like the idea and this is a great start!

It's looking good so far
I've just had a go at section 5!
SECTION 5: TACKLING & THE BATTLE OF ATTRITION
This section aims to identify tactics and strategies to help clear the field of opposition and also reduce the likelihood of your opponent taking out your players.
The key to winning with attrition is to always work out strategies to reduce your tackle & shove challenges to 1 success where possible, and try to generate momentum to improve your result.
1) Positioning.
Positioning is mentioned here because it is a very important factor to consider when looking at attrition
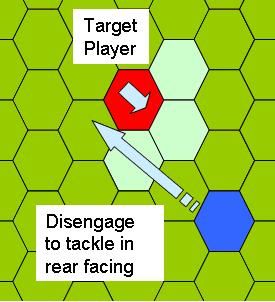
a) Player Facing
This critical part of Elfball and can mean a big difference as an opponent gets -1 to the number of successes needed if they are shoving or tackling you from the rear 3 hexes. At the end of your turn always position your players to minimise the risks of being hit from this direction. On the reverse side when Shoving or Tackling a player, you should be on the lookout to exploit any facing problems that your opponent has.
b) Player Support
In general, you need to ensure your players are in a position to support and protect each other. If you have a player exposed, your opponent will try to take him out. Having players close by gives you more opportunities to use player facing to reduce the number of successes needed for challenges.
c) Player Spacing & Zone Control
In the attrition game it’s critical to know how many hexes opponents players are away from your players. Space control is another key aspect to this game and you should use your high MIGHT and TACKLE players to control areas of the board and allow your ball handlers freedom to move.
2) Shoving
The shove itself can be easily overlooked as it doesn’t directly impact the health of an opposing player, however you can use shoving as an aggressive tactic to help reduce the number of opposition on the pitch.
The main advantage of shoving is because it’s a relatively safe action – a failed shove doesn’t cause a SiM or cause your player to fall over, and in many cases you can shove again if you pay a hex of JOG to do so. It’s still a Shift in Momentum if you flop a shove though!
Players are limited on the amount of shoves they can do (Half the player’s JOG attribute rounding up) which means most players can shove about 3 times a turn.
The best players for shoving have high MIGHT and average to high JOG. Dervishes and Dryads excel in it, although Strikers and Safeties can make pretty decent shove specialists.
Below are some common strategies to get the most out of the shove game:
a) Out of bounds.
Players too near the sidelines can easily fall prey to being shoved off the pitch. Players pushed out of bounds are permanently out of the test, so for tournament play especially this is more effective than tackling as there’s no injury roll, and no chance of the player coming back in from a potion.
So, with that in mind, it’s quite easy for your opponent’s players to stay 3 or 4 hexes away from the sidelines, right?
Well, there are several things that you can try to get opponents into the danger zone!
1) If your target moved last, you have 2 turns to shove the player before he is able to move again. Players like dryads and dervishes can effectively work in tandem to shove players long distances
2) You can set up a target for a tackle near the boundary, close to the maximum jog limit of your opponent’s player. You can have another player supporting them from towards the centre of the pitch. If the opponent takes the bait, you can use the supporting player to shove the opponent out
3) You can elect to throw the ball near to the boundary, this is especially good if the opponent player has enough jog to reach the ball but not enough to get it to safety again, and you have a supporting player close enough for the shove.
b) Into goal circle
There is a reason that the defender circle isn’t in a straight hex line to the goal circle! Be aware of your proximity to the goal circle when placing defensive players. It’s bad to be scored against, but even worse when your would-be safety is shoved into the goal circle en-route to the score.
The same notes apply to the goal circle as to the boundary line, but throwing the ball into an empty square between the goal circle and the boundary can make things very challenging for the defence, especially if they only have low skill players.
c) Guarding entrance areas
Reserves come on from the 2 entrance steps on their half of the pitch, up to a maximum of 3 hexes. If you can get a forward player hanging around one or both of your opponent’s entry areas, this will cause them massive problems when they need to bring in reserves, as you can simply shove them back the way they came!
This tactic can give you numerical advantage on one side of the pitch as players will have to make their way across from the other side.
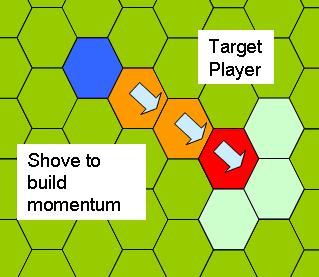
d) Shove to get momentum
This is easily the most common use of Shoving – if you are using a medium to high might player, simply identify some shoves where you only need 1 success that you can do before doing your critical action.
1) You could shove the target of an intended tackle, if they are low might and you have enough JOG a shove is a low risk way to generate some momentum for the Tackle challenge
2) If you are looking to make an Impact challenge against a higher might player, you can shove a lower might opponent player first to generate momentum before attempting the Impact challenge
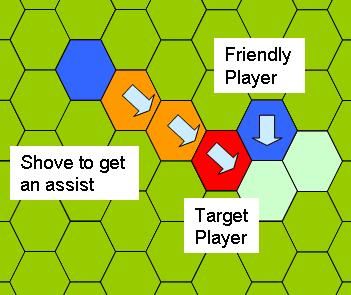
d) Shove to get assists
This tactic ties in with Tackles – a high dodge player in the open field is seldom worth the trouble tackling unaided, although if you have a team mate close by, you should aim is to shove the opponent into a square covered by at least 1 forward facing friendly player. This can generate momentum and reduce the number of successes needed for the Tackle
f) Dash challenge for an extra shove
Players can attempt a dash challenge for an extra shove attempt providing they have spare momentum. If you’re performing 3 shoves with a high might player, it’s likely that you can get enough momentum to perform the dash at the end of your turn. This can be effective when pushing players out of bounds or into the goal circle
3) Impact Challenges
These challenges must be passed to allow you to take down the higher might players like Monsters and Defenders. Commonly, high MIGHT players have a low DODGE attribute, which means that you generally need only 1 success on the Tackle challenge, so have decent chances of forcing an injury challenge.
a) The Bane of Defenders & Dwarves
Against MIGHT 4 players, the Impact challenge requires only 1 success if tackled from the rear or you have a friendly assist. This means a MIGHT 3 player has a 72% chance of passing the challenge, and also a 50% chance of actually getting momentum from it! If using any MIGHT 4 players you need to be very aware of this vulnerability
b) Tackle Tag
Once a monster has moved, He's unable to move again next turn. If he's unsupported, it's easy to place a friendly player with facing on the monster before hitting him with a tackle from another player in your next turn. With a helper, and hitting from the rear you can take the Impact Challenge down to just 1 success needed against the MIGHT 5 beasts.
c) Pick on a smaller guy first
Before working up to take out the other guy's monster, generate momentum by shoving one of their weedier players around first. You
really don't want to fail the impact challenge and be left stood next to them if you can help it - flopping the Impact challenge can actually be safer
4) The Tackle
OK, we’re finally at the important bit – the Tackle. Maybe it’s a hangover from other games I play, but I find it tempting just to run in and hit the opponents at every available opportunity without a massive amount of thought. – this is not a great tactic.
a) Tackling is not a no-brainer action
You need to think about whether it makes sense to hit a player with a Tackle this turn. If you need multiple successes, it may be worth waiting until you have an assist in place. A slide tackle might be just the job on the ball carrier, but for attrition purposes you need to wait until the time is right.
b) Get Momentum!
It’s worth saying it again, to make the Tackle stick, you really need to get some Momentum first. If your player has high DODGE, dodge him around your target, then hit him from the rear. If your player has high or medium MIGHT, consider a shove or 2 to get some extra Momentum.
c) The Magic 3 Successes
If you’re able to hit a Tackle with only 1 success needed, you’re actually going to need to roll 3 successes or better to stand a chance of injuring the opponent! With a TACKLE 4 player, you should be doing this 40% of the time without momentum.
If you need 2 successes on the tackle challenge, the chances of injury go to 22% and with 3 successes needed you’re looking at only a 10% chance of injuring your opponent!
This shows that you really need to look for and engineer the 1 success Tackle challenges to have any decent chance of injuring opponents. It’s seldom worth tackling opponents if you need more than 1 success
d) Re-rolling the Tackle
If you have Momentum – you did generate some, right?, and roll less than 2 more successes than needed in the Tackle challenge, feel free to re-roll any flops or blanks to get the best chance of getting an injury. If you have already rolled 2 more successes than needed, I wouldn’t bother with re-rolling any of the dice.
e) Re-rolling Injuries
It’s hard to generate additional Momentum on a Tackle challenge, but if you have any left over, you can use it to make your opponent re-roll successes on his Injury Challenge! This is a great way of increasing the odds that the player is out of the game!
Comments appreciated
Cheers,
Spiky


