The miser's guide to building a display stand

A forum for football mini's talk.......painting, converting etc. etc. or showing off great accessories that make playing the game easier, cooler or more fun.

Moderator: TFF Mods

Post Reply
nazgob
Legend
Legend
Posts: 2737
Joined: Tue Nov 10, 2009 8:31 am
Location: Somerset

The miser's guide to building a display stand

Post by nazgob »

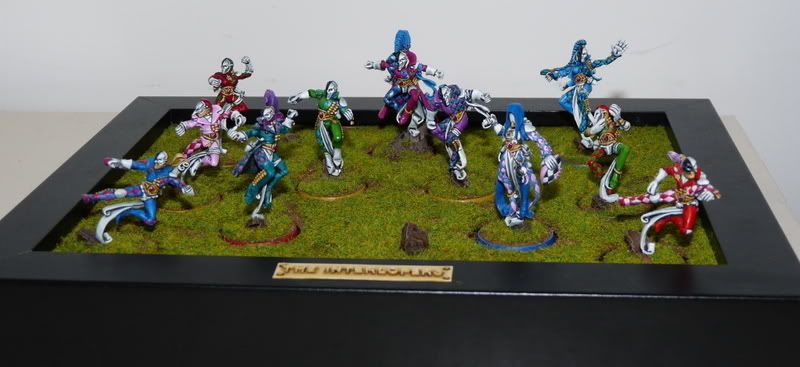
I am by no means an expert, but I thought I would post my (hopefully simple) system, which produced the following:

Image

Stage 1: Gather your materials

You will need some paint, a marker pen, some glue, some flock/static grass/gravel to match your players' bases and a decent craft knife. You will also require some 3mm foamboard or mdf - your choice, but if you lack access to power tools, go for the foamboard. (note: I used foamboard, but I'm confident that mdf would work just as well, if not better)

Finally, get yourself down to Poundland/Hobbycraft/Wilkinsons/any Supermarket. Buy yourself a picture frame. For added miserliness make sure to get one that looks good - you don't want to have to paint it. Also, ensure that your mdf/foamboard section is larger than your picture frame.

Stage 2: Building the base

Take your foamboard/mdf and cut it to the size of your picture frame. If it helps the visualisation process, imagine that the foamboard/mdf as the picture that will sit in the frame. Once it is the correct size, use the marker pen to plan the layout of your display. Use an old base as a marker, and draw lots of little circles.

(if using foamboard, follow option a), as option b) is for mdf)

option a) Using the craft knife, carefully cut out the holes. You want htese to be as smooth as possible, so take your time, and go slow. (nazgob does not accept any liability in the event of injury)

option b) ind a drill. Find a 28mm (or other suitable size) drill bit. Drill out the holes in the mdf.

Once you have made your holes, test them by passing a base through them. If it doesn't fit, you need to make it bigger. Top tip: Make all of the holes a little bigger than they need to be, so that you aren't stuggling to get the minis in and out of their slots.

Stage 3: Painting and Basing

Just as it sounds. Take the foamboard/mdf with holes in and make it match the rest of your team. I went for GW spray black, then brown, then flock/static grass, but I'm sure you can work out what to do.

Top tip: Make sure you paint the edges of the holes a dark colour - you don't them to stand out when they have models in them.

Stage 4: Assembly

Take your picture frame. Remove the glass. Insert the foamboard/mdf as if it were a picture (remember, no glass). Reassemble picture frame.

Finished.

Top Tip: Paint the bottom of your slots black so that they won't show around the edges of the model.

Reason: ''
duttydave
Star Player
Star Player
Posts: 604
Joined: Mon Nov 26, 2007 11:43 am

Re: The miser's guide to building a display stand

Post by duttydave »

A great idea, fairly easy to build and very effective. Well done.

Reason: ''
Image
User avatar
van der vaart
Emerging Star
Emerging Star
Posts: 330
Joined: Mon Jan 03, 2011 7:01 am
Location: Victoria, Australia

Re: The miser's guide to building a display stand

Post by van der vaart »

duttydave wrote:A great idea, fairly easy to build and very effective. Well done.
Agree with this. Thanks Nazgob!

Reason: ''
Commish of the Geelong And Regions Blood Bowl League;GARBBL!
Check us out at http://geelong.bloodbowlleague.com or Follow us on Twitter! https://twitter.com/#!/GARBBL
I have a blog! http://nubs11.blog.com/
Diamond Joe Quimby
Veteran
Veteran
Posts: 261
Joined: Sat Feb 19, 2005 9:17 pm
Location: lincs, UK

Re: The miser's guide to building a display stand

Post by Diamond Joe Quimby »

cheers mike, going material shopping today :)

Reason: ''
1st place - Welsh open 2012' CrumbBowl 2012
2nd place - exiles 3 2011
most touchdowns - GT '09, THRUDBALL '09, CAKEBOWL '11
Most casualties - White Isle Star Bowl II, Brewerz Bowl '11, Welsh open 2013
Stunty cup winner - exiles open '10
User avatar
spubbbba
Legend
Legend
Posts: 2270
Joined: Fri Feb 01, 2008 12:42 pm
Location: York

Re: The miser's guide to building a display stand

Post by spubbbba »

That’s a very simple and elegant solution; I think I’ll have to give it a try as it looks like it will work wonders seeing as how you have such a diverse selection of picture frame sizes.

Reason: ''
My past and current modelling projects showcased on Facebook, Instagram and Twitter.
User avatar
Buggrit
Ex-Mega Star, now just a Super Star
Posts: 1442
Joined: Thu Dec 22, 2005 2:38 pm
Location: Leading the G.W.A. Nation!

Re: The miser's guide to building a display stand

Post by Buggrit »

Cheers Naz... I'll have to give that a go at some point...

Reason: ''
Image
G.W.A. NATION!
Most CAS Albion Coast Trophy 2 & 3 Stunty Cup Thrudball 2015 Wooden Spoon Crumb Bowl 2 & NAF Championship 2012

SAWBBL's Cutlery King
User avatar
Axtklinge
Legend
Legend
Posts: 1948
Joined: Fri Apr 16, 2004 2:08 am
Location: Porto, Portugal
Contact:

Re: The miser's guide to building a display stand

Post by Axtklinge »

Very nice Nazgob!
Totally worth checking out your painting blog to see the different ones you've got there.

Reason: ''
User avatar
burgun824
Legend
Legend
Posts: 2274
Joined: Wed Sep 08, 2010 9:27 pm
Location: Nashville, TN

Re: The miser's guide to building a display stand

Post by burgun824 »

Well done Nazgob!

That's pretty much the exact same way I made this display base:

viewtopic.php?f=23&t=32181&hilit=tenna+city+titans

Two more tips I'd add to Nazgob's write-up

1) I definitely promote the power tool & MDF option. The holes you get are much cleaner. Also, if you drill them a tad too small you can pull out a sanding bit or dremel and go around the inside a few times to widen them.

2) Add magnets! If you purchase MDF or foamboard that's one size thicker (3/16" in US measurement...not sure what that is in metric, sorry) you can glue a 1" metal washer into each hole, glue a rare earth magnet into the bottom of each of your bases, and then they are locked in place. You can turn it upside down and nobody falls out (warning: some of the big guys take more magnets. That Gaspez Ogre took 4 to hold his fat ass in place)

Side note: an added bonus I've discovered with the magnets in the bases of the models; if you glue the magnet towards the front of the model's base (which I recommend doing anyway because it's easier to break free from the washer in the display base), you can glue a small, thin washer on the bottom of your football piece and the magnet is powerful enough to hold the football to the players base during a game.

Reason: ''
Dr. Von Richten
Super Star
Super Star
Posts: 876
Joined: Thu Sep 29, 2011 9:46 pm

Re: The miser's guide to building a display stand

Post by Dr. Von Richten »

Every time I see that Harlequin team of yours I want to take my hat of in deep respect and admiration ... and then I remember I don't wear a hat! :smoking:

Reason: ''
User avatar
Nod_Hero
Veteran
Veteran
Posts: 174
Joined: Tue Jan 04, 2011 12:22 am
Location: Florida, USA
Contact:

Re: The miser's guide to building a display stand

Post by Nod_Hero »

Excellent, thank you!

Reason: ''
3DB minion, Twitter maniac, Tumblr fan - That's me!
Post Reply