

http://sirskofisworkshop.blogspot.com.e ... -into.html
I will just copy and paste it here, I hope there isn't problems with that. Is quite long and the redaction is probably rubbish but the pictures capture the evolution.
I made this tutorial because a member of one of the forums that I usually visit ask me to.
The request was quite specific, he wanted me to explain how would I do the armour plates and other armour parts of the human thrower that appears in the wallpapers of the game Blood Bowl II. I only had a couple of shoots so I done the best I could with the little information at my disposition.
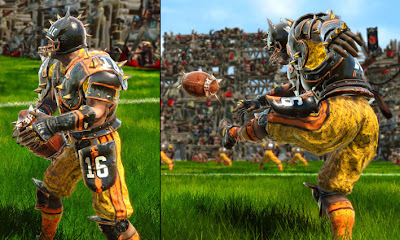
Pictures obtained from the Blood Bowl game website
Even if I only had to explain how to make the armour plates I decided to try to make a miniature with the stand shown in the left part of the picture above, well a mirror image of it. You can see the result of this tutorial in the picture below (the colour scheme is the one of our Human BB team).

Introduction
In this tutorial I used a mix of two epoxy putties: Green stuff and A+B white modelling putty.

To work with the putty I use sculpting tools, a hobby knife, rubber shapers and my fingers. If you are working with Green Stuff remember to wet the tools and your fingers.
Planning & bits preparation
I have used the following bits:
- Body and legs from the WFB Free Company box of The Empire range miniatures.
- Arms for the two handed sword from the WFB Free Company box of The Empire range miniatures.
- Head with hood from the WFB Bretonnian Peasant Bowmen.
- A copy of my own designed Blood Bowl ball.

Once the bits are chosen is a good idea to put them together to have an idea of how the model will look.

Changing the trousers
I wanted the model to have shorts so I added some putty to the upper part of the legs and sculpt some lines in it with a sculpting tool.

Adding the body armour
According to the pictures from the Blood Bowl II game I think that the model has armour all around its body. To make it we push a ball of putty in the chest and flatten it and another one in the back and do the same. We push the putty trying to merge both balls at the sides of the body. If there isn't enough putty we add more to fill the gaps.


Next we make a putty sausage and place it around the model waist. We cut the excess and flatten it with a sculpting tool to make the lower border of the body armour.

Making the knee-pads
The steps above are quite simple and I didn't go into too much detail, I think this part is more interest so I'm going to explain it a little better (I hope :-S).
First we need to place two putty balls of roughly the same size in both knees. I usually make a putty sausage and cut it in two equal parts in order to have more or less the same quantity of putty. I'll explain how to make the left one. The process for both is the same but I use the right one as trial and error.

We start by flattening the putty ball. Then we press the flat part of the sculpting tool at aproximately 1/4 of the vertical leng and then at 3/4, pushing a little bit the putty to the center. After that with the round part we continue to push the putty to the center.

Next we are going to make the upper and lower pointy edges. With the flat part of the sculpting tool we flatten the upper part of the putty ball first from the left then from the right. Then we push the putty of the left part with the flat part of the sculpting tool down and after the putty of the right part. We do the same thing in the lower edge and then we improve the shape using the flat and curved parts of the sculpting tool.

The basic shape of the knee-pad is done, now we need to improve the right and left ends. The end that is in the exterior is going to have a small disk. With the sharp part of a sculpting tool or a hobby knife we cut the putty at that end and after that we add a small putty ball and flatten it. To the interior end we only have to check the shape and cut a little bit of the putty in case it is necessary.

In the picture below you can see the knee-pads finished.

Adding the armour plates in the upper part of the legs
We make two roughly equal putty balls and place them in the upper part of the legs. Then we flatten them with the sculpting tool and start shaping the putty, pushing part of the putty until we have the basic shape we wanted. Next we gave to it some curvature with the curved part of the sculpting tool and the conic handle of the sculpting tool.

I like the plates as they were but they weren't too similar to the ones that the BBII thrower has, so I tried to modified them a little more. Now that we have the shape we mark two lines with the sharp edge of the sculpting tool. We also push the sculpting tool point in the upper part of the exterior side. Next with a pin we mark the position for the rivets and make the rivets cutting small slices of a slim putty sausage and giving them a ball shape with our fingers. We place the rivets in their places and push them a little bit to merge them with the rest of the putty.

We do the same in the other leg.

Now the miniatures looks like the one in the pictures below.

Adding the final details to the legs
To finish with the legs we need do a few more things.
First, cover the gap in the rear part of the legs. We place a slim putty sausage and push it into the gap, then we cut out the excess.

We also have to add a strap to the knee-pads. We made some putty sausages, place them in place, flatten them, shape them a little with and cut the excess.

Last, we have to make the player shocks. We made more putty sausages, place them in place and now we try to merge its lower edge to the leg so there is a small edge to limit what is the shock and what is the bare leg.

In the picture below you can see how the thrower looks like after all this steps.

And below how it looks like with the arms.

Changing the position of the right arm
I tried to use the arms as they were but the position was a little weird so I cut the right arm at the elbow and glue the parts to get the position that I needed.


Sculpting the muscles of the arms
To sculpt the muscles we start by placing a few putty balls and sausages on top of the arm where the main muscles will be. Then we merge the different pieces of putty slowly with the round part of the sculpting tool and finally we mark a little better the different muscles with the sculpting tool or some rubber shapers.


If while you are merging the different pieces of putty you clearly see that you have more putty than you need, cut some of it with a hobby knife and continue shaping.


I wanted to show you how I do it but in this case most of the arms will be covered by protections so it wasn't too important to do muscles that detailed.
Sculpting the small protections at the sides of the shoulder pads
We place two balls of the putty at the sides of the shoulders and flatten them with the flat part of the sculpting tool until its thickness is the desired one and the surface is smooth. Next with a hobby knife we cut the putty to obtain the shape we wanted and then we shape it a little bit with the sculpting tool.

The protection like that are quite harmless so we are going to add some small spikes to them and make and mark a flange on to them. For the spikes we made a putty sausage, place it in the lower part of the protection, then with flat part of the sculpting tool we push its upper side and lower side to obtain a pointy shape similar to a camping tent. Then with the sharp part of the sculpting tool or a hobby knife we divide the putty sausage in equal pieces, doing vertical cuts and pushing the putty to the sides, then we give the spikes a little more shape. Now we made a mark along the edge of the lower protection to give to it a flange and also we push a little bit the flat part of the sculpting tool in the lower edge of the upper protection to give to it a different more subtle flange.

Sculpting the shoulder pads
We made a thick putty sausage and place it in the shoulder, then we start to flatten it but making sure the center is thicker.

Then we made two putty balls and place them at the ends of the putty sausage. We flatten them and merge them with the rest.

Now we left the putty cure. Then we add 6 big spikes to the shoulder pad. To make the spikes we made a long putty sausage and divided it into pieces, at least into 6 equal pieces, but its easier to divided in 8 pieces, making first a cut at the middle, then cutting each part at the middle and cutting the pieces once more at the middle. We give a conic shape to each piece with our fingers and place it in the shoulder pad, we give a pyramid shape to each piece with the sculpting tool. I place the three spikes nearer the head first and shape them and after I did the others because like that I had more space to work on them. The spikes I manage to sculpt weren't as pointy as I wanted them so once the putty was cured I cut them with a hobby knife to obtain the pointy spikes.

Sculpting the hands and the brass knuckles
The hand have gloves on them so there is no need for lots of details. To make the hands we place a big ball of putty and a small one for the thumb. We merge both together and then start marking divisions for the rest of the fingers in the bigger ball. Then we have to shape each finger individually, giving them some phalanx.

Once the hand is cured we place a little putty sausage in the "knuckles" and flatten it, with a hobby knife we cut the ends and around the sides so we get parallel straight sides.

Once the putty sausage is cured we place another one on top of it, give it a pointy shape like a tent and divide it into for parts with a hobby knife. Then carefully we shape each part into a small pyramid.

Sculpting more protections to the arms
I'm pretty sure you are quite bored by now but there isn't much more left.
To make the arm protections we made a putty sausages, place it on the arm, flatten it with the sculpting tool giving to it a little tend shape and cut the excess of putty to obtain the final shape. That's it quite simple frankly. Latter in the process I have some spare putty and added to them 3 spikes near the elbows so the protections can also be used to cause pain.

So now that the arms are finished the model looks like you can see in the picture below.

Sculpting a helmet
I have shown before how to make a helmet in other tutorials, like the one where I explained how I converted the free company men into blood bowl linemen. But it is quite easy, you place a putty ball on top of the head, then push it with the fingers, continue pushing it to the rear of the head with the sculpting tool to cut the excess of the putty at the nape.

Then we shape it as we want and that is it.

Adding some details to the helmet
The helmet is done but we are going to give it a little more details.
I made a couple of wings to put at each side of the helmet and "hold" the facial protection following this other tutorial:
http://sirskofisworkshop.blogspot.com.e ... -flat.html

Once the wings where cured I glued them to the helmet. Then I made a putty sausage and cut small pieces of it and give them a conic shape with the fingers to make some conic spikes for the helmet. To help placing them and joining them to the helmet I put a small drop of superglue where the spikes should go. This can be help full but with uncured putty can also be a disaster so be careful.

Finally I added a couple more putty sausages to make the facial protections.

Here is where I have some putty left and I decided to add some spikes to the arm protections, I use the same system as with the spikes of the helmet, using a little bit of superglue to hold the putty in its place while still uncured.

That's all folks!!


Hope you like it! Comments are always welcome.


